

Blog
How to Remove Iron On Patches safely?
Iron-on patches are an easy way to personalize your clothes, bags, or uniforms but taking them off can be tricky if you don’t use the right technique. Whether you’re working with denim, cotton, or delicate polyester, here are three proven methods to remove iron-on patches without damaging your fabric.
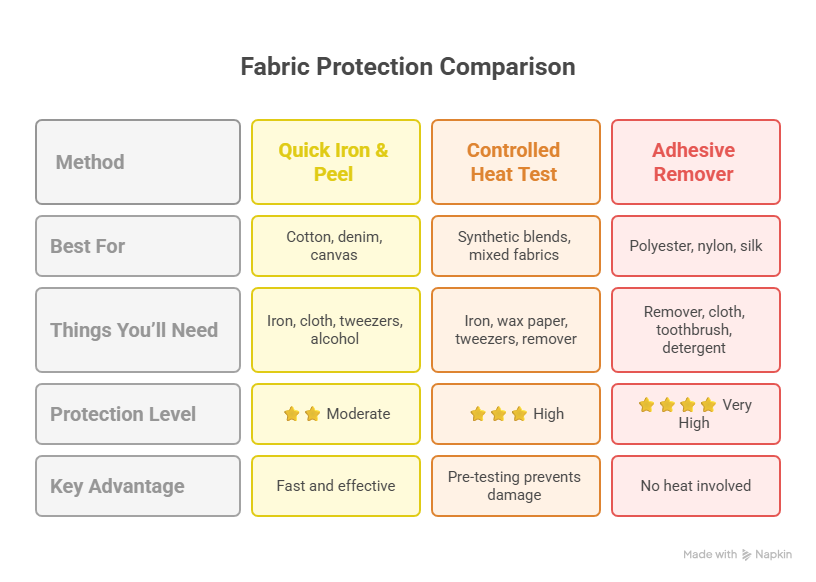
1.Quick Iron & Peel Method
Best for: Sturdy fabrics like cotton, canvas, or denim
Things You’ll Need:
- Clothes iron (set to medium heat, no steam)
- Thin cotton cloth or parchment paper
- Tweezers or butter knife
- Rubbing alcohol or adhesive remover
- Clean cloth
Step-by-Step Instructions
Heat the patch:
Place a thin cloth over the patch and press the iron for 20–30 seconds to loosen the adhesive.
- Lift a corner: Use tweezers or a butter knife to raise one edge of the patch.
- Peel off gently: Slowly pull off the patch. If it resists, reapply heat and repeat.
Clean the surface: Use rubbing alcohol or adhesive remover to eliminate any remaining glue.
Pro Tip: For delicate materials like polyester or nylon, use a hairdryer instead of direct iron heat for safer control.
2. Controlled Heat Test & Ironing Method
Best for: Synthetic blends or when you’re unsure of the fabric type
Things You’ll Need:
- Clothes iron
- Wax paper or thin pressing cloth
- Ironing board or protective towel
- Tweezers
- Adhesive remover or rubbing alcohol
- Scissors (optional)
Step-by-Step Instructions
- Prepare your workspace: Lay the item flat on an ironing board or towel.
- Test the fabric:
- Place wax paper or thin cloth on a hidden area.
- Press the iron (set to the highest safe temperature for that fabric) for 15 seconds.
- If the fabric scorches, stop and switch to the adhesive remover method.
- Place wax paper or thin cloth on a hidden area.
- Heat the patch: Cover it with wax paper or a thin cloth and press for 15–20 seconds.
- Peel the patch: Lift the edge with tweezers, reapply heat if needed, and peel it away gently.
Clean up: Use adhesive remover or rubbing alcohol to clear any residue.
3. Adhesive Remover Method
Best for: Delicate fabrics or when heat methods are unsafe
Things You’ll Need:
- Fabric-safe adhesive remover (e.g., Goo Gone, K2r, or similar)
- Soft cloth or rag
- Old toothbrush
- Liquid laundry detergent
- Sink or water source
Scissors (optional)
Step-by-Step Instructions
- Test first: Apply the remover to a hidden spot to ensure it doesn’t discolor the fabric.
- Turn the item inside out: Expose the back of the patch.
- Apply remover: Pour or spray the product onto the fabric behind the patch and rub gently with your fingers or a cloth.
Loosen and peel: After about a minute, check if the patch lifts. If partly detached, trim and reapply remover until it fully comes off.
Tips for Removing Residue:
- Dab adhesive remover on leftover glue.
- Rub with a rag or old toothbrush for one minute.
- Pretreat the spot with liquid detergent.
- Wash normally, but do not dry until all residue is gone.
- Repeat if needed for a clean finish.
Final Recommendation
If you’re unsure about the fabric, start with the Adhesive Remover Method. it’s the most fabric-friendly and avoids heat damage.
For sturdy fabrics like jeans or cotton jackets, the Quick Iron & Peel Method works efficiently.
Always finish by removing any residue and air-drying the fabric to keep it looking new.